Writing the flow
A flow encodes a sequence of steps that a node can perform to achieve a specific ledger update. By installing new flows
on a node, we allow the node to handle new business processes. The flow we define will allow a node to issue an
IOUState onto the ledger.
Flow outline
The goal of our flow will be to orchestrate an IOU issuance transaction. Transactions in Corda are the atomic units of change that update the ledger. Each transaction is a proposal to mark zero or more existing states as historic (the inputs), while creating zero or more new states (the outputs).
The process of creating and applying this transaction to a ledger will be conducted by the IOU’s lender, and will require the following steps:
- Building the transaction proposal for the issuance of a new IOU onto a ledger
- Signing the transaction proposal
- Recording the transaction and sending it to the IOU’s borrower so that they can record it too
We also need the borrower to receive the transaction and record it for itself. At this stage, we do not require the borrower to approve and sign IOU issuance transactions. We will be able to impose this requirement when we look at contracts in the next tutorial.
警告
The execution of a flow is distributed in space and time, as the flow crosses node boundaries and each participant may have to wait for other participants to respond before it can complete its part of the overall work. While a node is waiting, the state of its flow may be persistently recorded to disk as a restorable checkpoint, enabling it to carry on where it left off when a counterparty responds. However, before a node can be upgraded to a newer version of Corda, or of your Cordapp, all flows must have completed, as there is no mechanism to upgrade a persisted flow checkpoint. It is therefore undesirable to model a long-running business process as a single flow: it should rather be broken up into a series of transactions, with flows used only to orchestrate the completion of each transaction.
Subflows
Tasks like recording a transaction or sending a transaction to a counterparty are very common in Corda. Instead of forcing each developer to reimplement their own logic to handle these tasks, Corda provides a number of library flows to handle these tasks. We call these flows that are invoked in the context of a larger flow to handle a repeatable task subflows.
FlowLogic
All flows must subclass FlowLogic. You then define the steps taken by the flow by overriding FlowLogic.call.
Let’s define our IOUFlow. Replace the definition of Initiator with the following:
// Add these imports:
import net.corda.core.contracts.Command
import net.corda.core.identity.Party
import net.corda.core.transactions.TransactionBuilder

// Replace Initiator's definition with:
@InitiatingFlow
@StartableByRPC
class IOUFlow(val iouValue: Int,
              val otherParty: Party) : FlowLogic<Unit>() {

    /** The progress tracker provides checkpoints indicating the progress of the flow to observers. */
    override val progressTracker = ProgressTracker()

    /** The flow logic is encapsulated within the call() method. */
    @Suspendable
    override fun call() {
        // We retrieve the notary identity from the network map.
        val notary = serviceHub.networkMapCache.notaryIdentities[0]

        // We create the transaction components.
        val outputState = IOUState(iouValue, ourIdentity, otherParty)
        val command = Command(TemplateContract.Commands.Action(), ourIdentity.owningKey)

        // We create a transaction builder and add the components.
        val txBuilder = TransactionBuilder(notary = notary)
                .addOutputState(outputState, TemplateContract.ID)
                .addCommand(command)

        // We sign the transaction.
        val signedTx = serviceHub.signInitialTransaction(txBuilder)

        // Creating a session with the other party.
        val otherPartySession = initiateFlow(otherParty)

        // We finalise the transaction and then send it to the counterparty.
        subFlow(FinalityFlow(signedTx, otherPartySession))
    }
}
// Add these imports:
import net.corda.core.contracts.Command;
import net.corda.core.identity.Party;
import net.corda.core.transactions.SignedTransaction;
import net.corda.core.transactions.TransactionBuilder;

// Replace Initiator's definition with:
@InitiatingFlow
@StartableByRPC
public class IOUFlow extends FlowLogic<Void> {
    private final Integer iouValue;
    private final Party otherParty;

    /**
     * The progress tracker provides checkpoints indicating the progress of the flow to observers.
     */
    private final ProgressTracker progressTracker = new ProgressTracker();

    public IOUFlow(Integer iouValue, Party otherParty) {
        this.iouValue = iouValue;
        this.otherParty = otherParty;
    }

    @Override
    public ProgressTracker getProgressTracker() {
        return progressTracker;
    }

    /**
     * The flow logic is encapsulated within the call() method.
     */
    @Suspendable
    @Override
    public Void call() throws FlowException {
        // We retrieve the notary identity from the network map.
        Party notary = getServiceHub().getNetworkMapCache().getNotaryIdentities().get(0);

        // We create the transaction components.
        IOUState outputState = new IOUState(iouValue, getOurIdentity(), otherParty);
        Command command = new Command<>(new TemplateContract.Commands.Action(), getOurIdentity().getOwningKey());

        // We create a transaction builder and add the components.
        TransactionBuilder txBuilder = new TransactionBuilder(notary)
                .addOutputState(outputState, TemplateContract.ID)
                .addCommand(command);

        // Signing the transaction.
        SignedTransaction signedTx = getServiceHub().signInitialTransaction(txBuilder);

        // Creating a session with the other party.
        FlowSession otherPartySession = initiateFlow(otherParty);

        // We finalise the transaction and then send it to the counterparty.
        subFlow(new FinalityFlow(signedTx, otherPartySession));

        return null;
    }
}
If you’re following along in Java, you’ll also need to rename Initiator.java to IOUFlow.java.
Let’s walk through this code step-by-step.
We’ve defined our own FlowLogic subclass that overrides FlowLogic.call. FlowLogic.call has a return type
that must match the type parameter passed to FlowLogic - this is type returned by running the flow.
FlowLogic subclasses can optionally have constructor parameters, which can be used as arguments to
FlowLogic.call. In our case, we have two:
iouValue, which is the value of the IOU being issuedotherParty, the IOU’s borrower (the node running the flow is the lender)
FlowLogic.call is annotated @Suspendable - this allows the flow to be check-pointed and serialised to disk when
it encounters a long-running operation, allowing your node to move on to running other flows. Forgetting this
annotation out will lead to some very weird error messages!
There are also a few more annotations, on the FlowLogic subclass itself:
@InitiatingFlowmeans that this flow is part of a flow pair and that it triggers the other side to run the the counterpart flow (which in our case is theIOUFlowResponderdefined below).@StartableByRPCallows the node owner to start this flow via an RPC call
Let’s walk through the steps of FlowLogic.call itself. This is where we actually describe the procedure for
issuing the IOUState onto a ledger.
Choosing a notary
Every transaction requires a notary to prevent double-spends and serve as a timestamping authority. The first thing we
do in our flow is retrieve the a notary from the node’s ServiceHub. ServiceHub.networkMapCache provides
information about the other nodes on the network and the services that they offer.
注解
Whenever we need information within a flow - whether it’s about our own node’s identity, the node’s local storage,
or the rest of the network - we generally obtain it via the node’s ServiceHub.
Building the transaction
We’ll build our transaction proposal in two steps:
- Creating the transaction’s components
- Adding these components to a transaction builder
Transaction items
Our transaction will have the following structure:
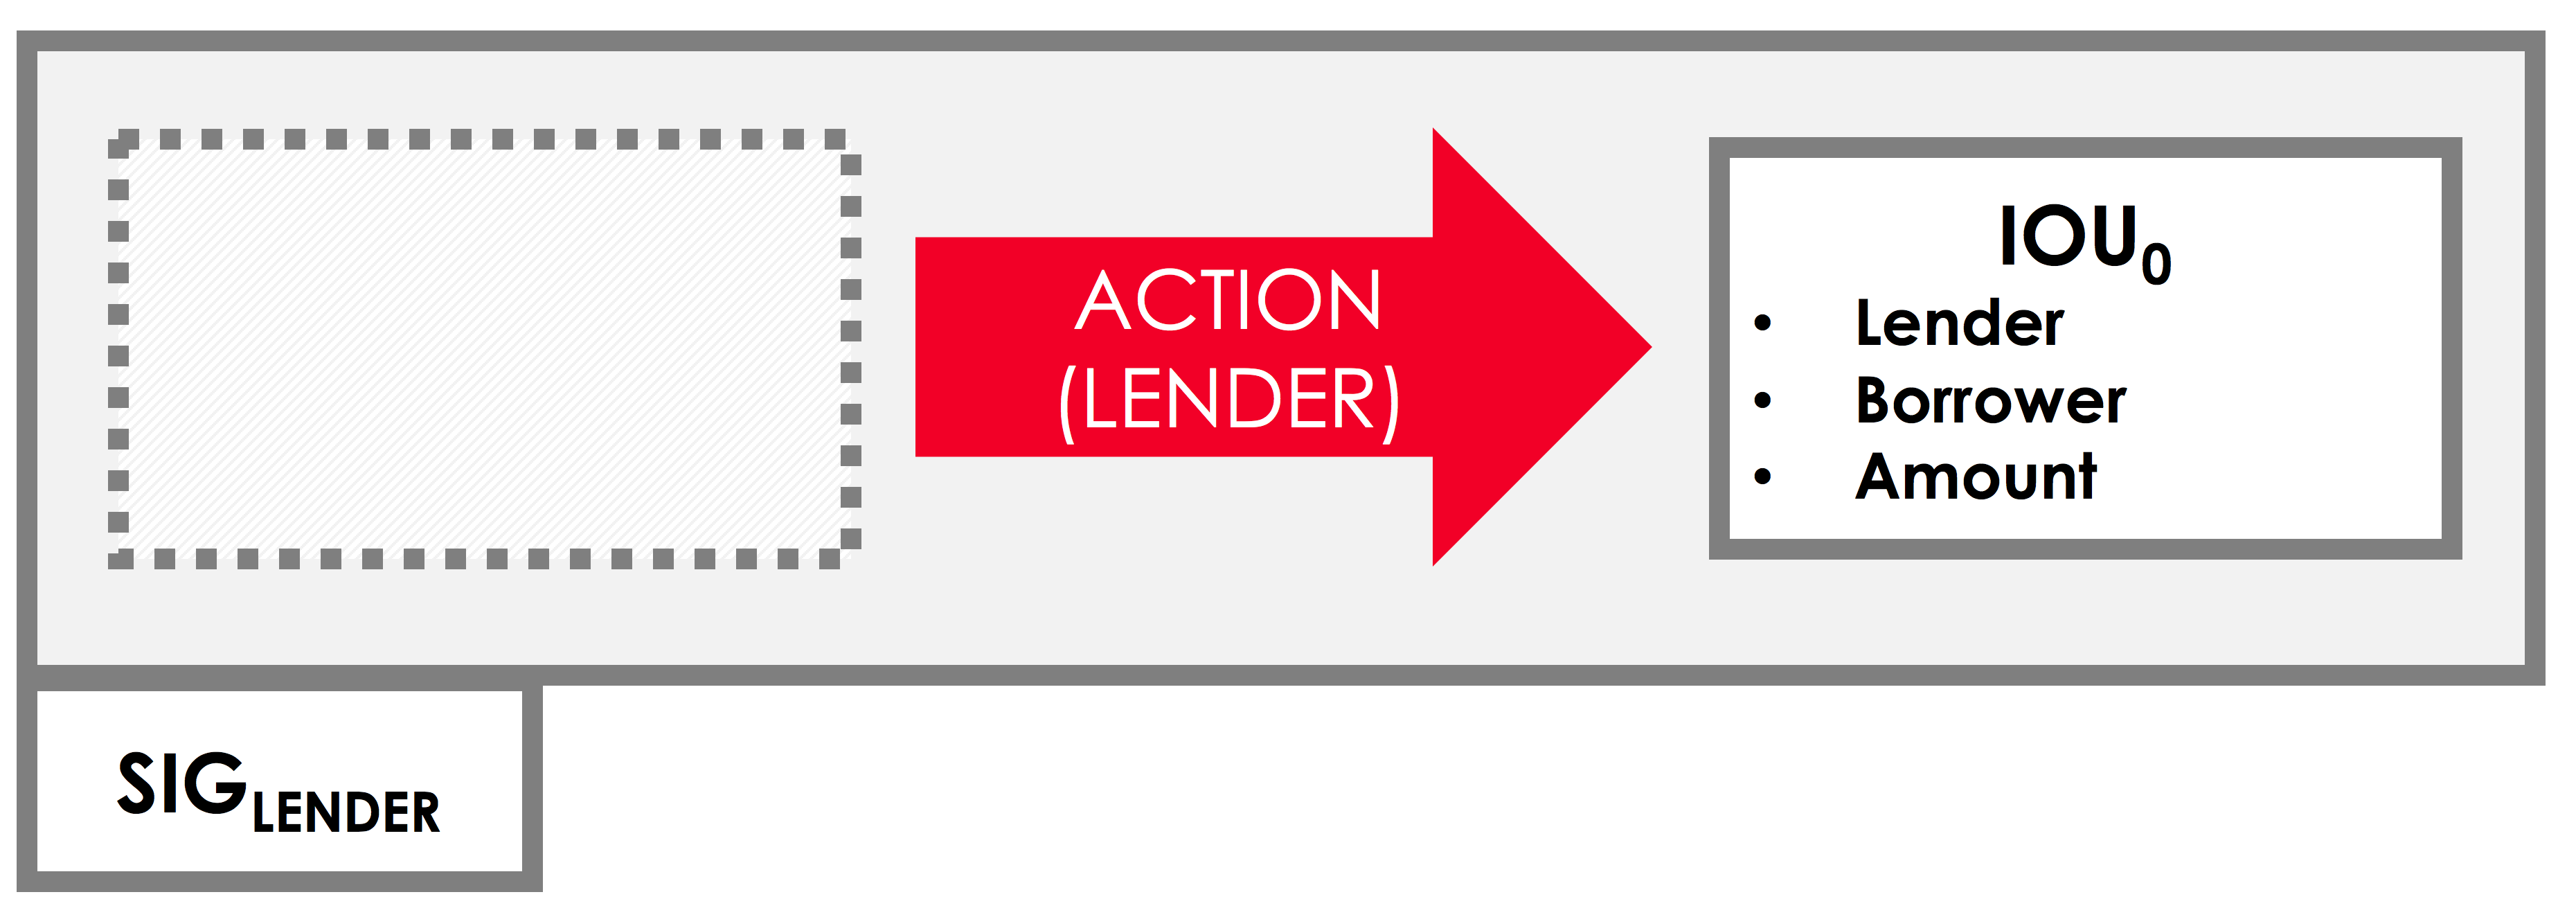
- The output
IOUStateon the right represents the state we will be adding to the ledger. As you can see, there are no inputs - we are not consuming any existing ledger states in the creation of our IOU - An
Actioncommand listing the IOU’s lender as a signer
We’ve already talked about the IOUState, but we haven’t looked at commands yet. Commands serve two functions:
- They indicate the intent of a transaction - issuance, transfer, redemption, revocation. This will be crucial when we discuss contracts in the next tutorial
- They allow us to define the required signers for the transaction. For example, IOU creation might require signatures from the lender only, whereas the transfer of an IOU might require signatures from both the IOU’s borrower and lender
Each Command contains a command type plus a list of public keys. For now, we use the pre-defined
TemplateContract.Action as our command type, and we list the lender as the only public key. This means that for
the transaction to be valid, the lender is required to sign the transaction.
Creating a transaction builder
To actually build the proposed transaction, we need a TransactionBuilder. This is a mutable transaction class to
which we can add inputs, outputs, commands, and any other items the transaction needs. We create a
TransactionBuilder that uses the notary we retrieved earlier.
Once we have the TransactionBuilder, we add our components:
- The command is added directly using
TransactionBuilder.addCommand - The output
IOUStateis added usingTransactionBuilder.addOutputState. As well as the output state itself, this method takes a reference to the contract that will govern the evolution of the state over time. Here, we are passing in a reference to theTemplateContract, which imposes no constraints. We will define a contract imposing real constraints in the next tutorial
Signing the transaction
Now that we have a valid transaction proposal, we need to sign it. Once the transaction is signed, no-one will be able to modify the transaction without invalidating this signature. This effectively makes the transaction immutable.
We sign the transaction using ServiceHub.signInitialTransaction, which returns a SignedTransaction. A
SignedTransaction is an object that pairs a transaction with a list of signatures over that transaction.
Finalising the transaction
We now have a valid signed transaction. All that’s left to do is to get the notary to sign it, have that recorded
locally and then send it to all the relevant parties. Once that happens the transaction will become a permanent part of the
ledger. We use FinalityFlow which does all of this for the lender.
For the borrower to receive the transaction they just need a flow that responds to the seller’s.
Creating the borrower’s flow
The borrower has to use ReceiveFinalityFlow in order to receive and record the transaction; it needs to respond to
the lender’s flow. Let’s do that by replacing Responder from the template with the following:
// Replace Responder's definition with:
@InitiatedBy(IOUFlow::class)
class IOUFlowResponder(private val otherPartySession: FlowSession) : FlowLogic<Unit>() {
    @Suspendable
    override fun call() {
        subFlow(ReceiveFinalityFlow(otherPartySession))
    }
}
// Replace Responder's definition with:
@InitiatedBy(IOUFlow.class)
public class IOUFlowResponder extends FlowLogic<Void> {
    private final FlowSession otherPartySession;

    public IOUFlowResponder(FlowSession otherPartySession) {
        this.otherPartySession = otherPartySession;
    }

    @Suspendable
    @Override
    public Void call() throws FlowException {
        subFlow(new ReceiveFinalityFlow(otherPartySession));

        return null;
    }
}
As with the IOUFlow, our IOUFlowResponder flow is a FlowLogic subclass where we’ve overridden FlowLogic.call.
The flow is annotated with InitiatedBy(IOUFlow.class), which means that your node will invoke
IOUFlowResponder.call when it receives a message from a instance of Initiator running on another node. This message
will be the finalised transaction which will be recorded in the borrower’s vault.
Progress so far
Our flow, and our CorDapp, are now ready! We have now defined a flow that we can start on our node to completely automate the process of issuing an IOU onto the ledger. All that’s left is to spin up some nodes and test our CorDapp.